Sunday, November 25, 2012

DIY Children's Bookshelf - Book Covers Showing!


The day has come!  I've had the supplies for months , but I finally finished this bookshelf that displays the book covers!  My kids initiate reading tons more now, so I think it's worth every penny and all the effort!!  Here's how it's done...

Materials Needed:
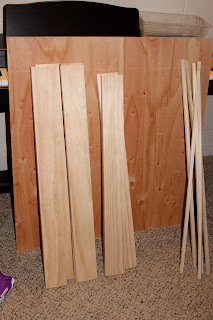
Back Square Piece (34.5" x 36")
1 x 4 x 6' Wood boards (4 boards 34.5" for the perimeter, 2 boards 33" for shelves) 
6 Dowels (this time I tried the square ends rather than the circular ends)
Wood Filler or Wall Spackle
White Primer
Paint color

Tools Needed:
Power drill
Hand saw (to cut dowels to correct size)
Sand paper
Screws (1 5/8 in.)
Countersink tool (to embed your screws so you can cover with filler for smooth finish)


1. Decide what size bookshelf you want.  If you can get a back piece for cheap (like at Home Depot's "Cull Lumber" - which are their discounted scraps usually from 50 cents - $4) that may decide what size you can do.  For my previous bookshelf, I used Lowe's bead board so I had to do 2' x 3'.

I choose to have 4 pieces - 34.5" long.

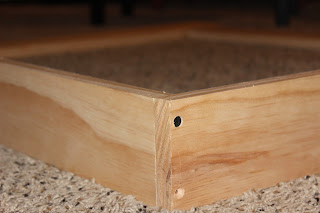
2. Begin to screw all sides together.  I used my countersink tool to pre-drill holes for the screws.  After the screws were all in, I used wood filler to cover up the holes.  After it dries, you sand those spots.  
3. Screw the backing on.  I had trouble getting my square back to perfectly fit just fyi.  So mine doesn't match up just right.  I ended up having to do a lot of sanding and it wasn't at all perfect - but oh well!  I did about 4 screws along each side.

4. Put in your 2 middle shelves and screw them in along the sides and back.


 6. Sand the whole project.  First coarse and then fine.  Maybe it's because I bought the cheapest electric sander, but I think I prefer just using my hand.  My project could have used a ton more sanding but I just didn't have the time!  At one point I had Penny in my carrier and the kids swarming around me on their bikes in our community laundry room while I tried to bust out the electric sander!  It must have been a funny sight to see.

7. Prime and Paint.  You want to prime the new wood so your wood doesn't completely soak up all your final paint.  I used a roller brush and regular paint brush just for the edges.


8. Cut the dowels (which keep the books in) to just the right size.It's better to cut a little big at first since it's easy to quickly saw to make it a perfect fit.

9. Pre-drill pilot holes through the sides and dowels to prevent breaking the wood.  After screwing each dowel into place on both sides, cover holes with filler/spackle.  I also spackled each corner for a smoother finish.  When dry, sand those spots and touch up paint.

10. And  you have your awesome bookshelf!  I used these corner brackets (directly under the middle shelves, screwed into the wall studs) to make it extra sturdy.




Friday, November 9, 2012

Potty Train in 3 Days... It worked!!!!

We finally did it.  My oldest child is fully potty trained.  I secretly worried and wondered if the day would ever come :).  I made my first attempt when my little boy was just 2 and it seemed like he wasn't at all physiologically or verbally ready for it.  Then at 2 1/2, I tried again but it was an utter failure and a totally frustrating experience for all of us!  We tried the method of pumping him with lots of fluids, trying to keep him on the potty practically all day, and making him go to the potty like every 20 minutes.  Then we had a baby, and life was just too crazy.  We ended up back and forth in pull-ups for sleep and running errands and such.  It was NO GOOD.  So we took a break and put him back in diapers.

A friend whole-heartedly recommended "3 Day Potty Training" by Lora Jensen.  It's an ebook that you buy online and then you get the PDF electronic copy and a lifetime of one-on-one mentoring with Lora.  She doesn't just email one to two sentences.  She'll email you full paragraphs to help you with your specific questions.  This lady is brilliant and her method worked amazingly!!!  So here's basically what we did:

For Preparation:
-She recommends potty training as early as 22 months if they are showing the signs of readiness... basically that they have a way to communicate to you the need to go potty.  It worked for us at age 3.  She explains more signs in her ebook.

-Since we had previously started a different method that didn't work, we put him back in diapers completely for at least 30 days before starting this new method.

-we went to the store to let him pick out his own underwear.

-We made it a PARTY!  The night before, I taped balloons, some underwear, and  pictures of him on the bathroom door.

-We Decided on rewards we wanted to do.  For example, putting fuzz balls in a jar and opening up a dollar store gift when it's full.  Or M&Ms or fun stickers, etc.  We chose a special reward for #2 - go-gurts!   


-I stocked my fridge with a fun variety of exciting drinks.  We let him help pick these out too ... I put them all in a big container in the fridge a couple days before we began just to build up the excitement and suspense.


For Day 1:

-He woke up, and we marched to the bathroom to get super excited about our POTTY PARTY!  I over-emphasized how now he was a "BIG BOY" and how PROUD I was of him!  

-The KEY was to STAY POSITIVE and PRAISE continually for 3 days straight.  For 3 days, I needed to believe in him and not get frustrated.  

-We TOOK OFF his very LAST DIAPER and I had him THROW AWAY EVERY DIAPER/pull-up left.  This part is more for the parent than the child.  She says you MUST GET RID of every last one so you won't be tempted to revert back to them.


-Then, he got to pick out HIS FIRST UNDERWEAR to wear!

-We excitedly ran back to the potty, and I explained 2 things:
1. Keep your underwear DRY and
2. TELL MOMMY when you have to go

Absolutely NO more asking him if he needs to go.  You only say over and over again... "Tell Mommy when you need to go."  You now are fully trusting him that by the end of the 3 days, he will learn to tell you.  It may take the full 3 days and lots of accidents, but stick with it, and it will click.   

Tips for Days 1-3:

*For 3 full days, STAY RIGHT BY HIS SIDE!!  The key is to never leave his side so you can catch him "in the act," scoop him up, and run him to the potty to hopefully "FINISH" in the toilet.  Even if he only ends up going one drop into the toilet - PRAISE HIM!!  Stay positive and encouraging even in the midst of accidents.  Keep reminding him throughout the day to tell you when he needs to go, and be super excited every time he does tell you!!
*All throughout the day, praise him for staying dry.  You can ask him if he's dry, have him feel to check, and praise again.  
*NEVER force him to go.  No more making him "try" or requiring that he stay on the potty longer.  
* Since #2 is hard, make sure you pick a special reward that will mean a lot to your child.  To get this part totally down with no accidents, it took actually a little longer than 3 days for us.  
*We never reverted back to diapers/pull ups - even for naps and nights.  We did go through accidents and changing sheets and washing lots of underwear those first few days.  But he learned by following the steps Lora recommends for nap/sleep time...  We didn't give him liquids 2 hours before bedtime (which was a total change for us).  Check out the ebook for more suggestions and tips.  She has great ideas that totally helped us.  I honestly was suspicious that it wouldn't work, but he did it!!!!!  

There are so many potty training methods out there, but I'm so grateful that this finally worked for us.  THERE IS HOPE for us mothers!